- 1Laser-cut acrylic faceThe most common choice
- 2Cast acrylic faceOne piece, no glued joint
- 33D-printed faceReady in one job
MINGDA AD-F4 · the letter face
Return only, or the face too? Three ways to make a channel letter on the AD-F4
A question we are often asked about the AD-F4 is whether it prints only the return or the face of the letter as well. It can do both, and the letter can be built in three ways. The printer always makes the return, the side wall that gives the letter its depth. What changes is the face: a sheet of acrylic cut on a laser and glued on, acrylic resin poured into the printed outline and cured under UV light, or a face printed together with the return. Each method gives a different look, needs different equipment and suits different jobs. Below are the steps of each method, a comparison and the questions customers ask us before an order.
Method 1
Laser-cut acrylic face
The most common choice
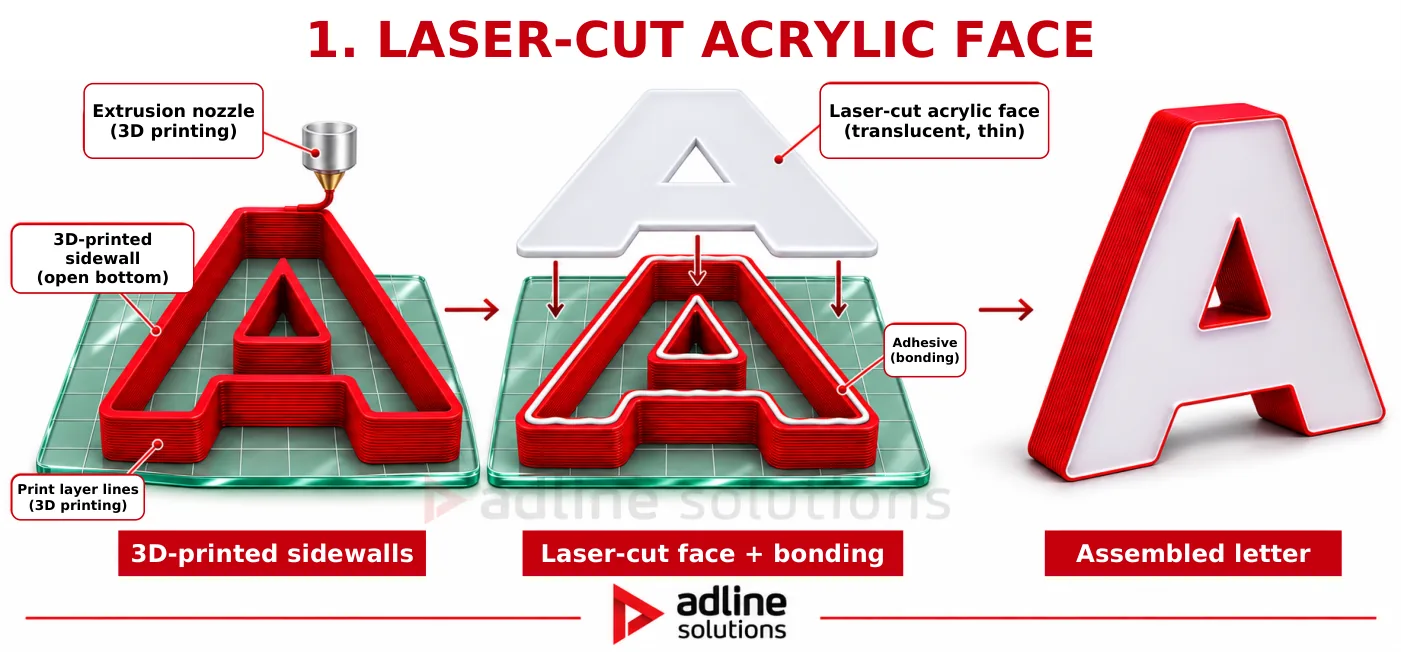
The AD-F4 prints the return in opaque AdPETG, which keeps the light from showing through the wall, and the back of the letter as well if you want it. The face is cut on a laser from opal acrylic, from the same vector file, and glued onto the return. The result is the classic channel letter your customers already know, only the return is no longer bent by hand. Most sign shops choose this method because they already have a laser and know how to work with acrylic: the AD-F4 takes over the part that needed the most hand work.
You need: the AD-F4 and a laser to cut the acrylic face, plus the adhesive of your choice.
Method 2
Cast acrylic face
One piece, no glued joint
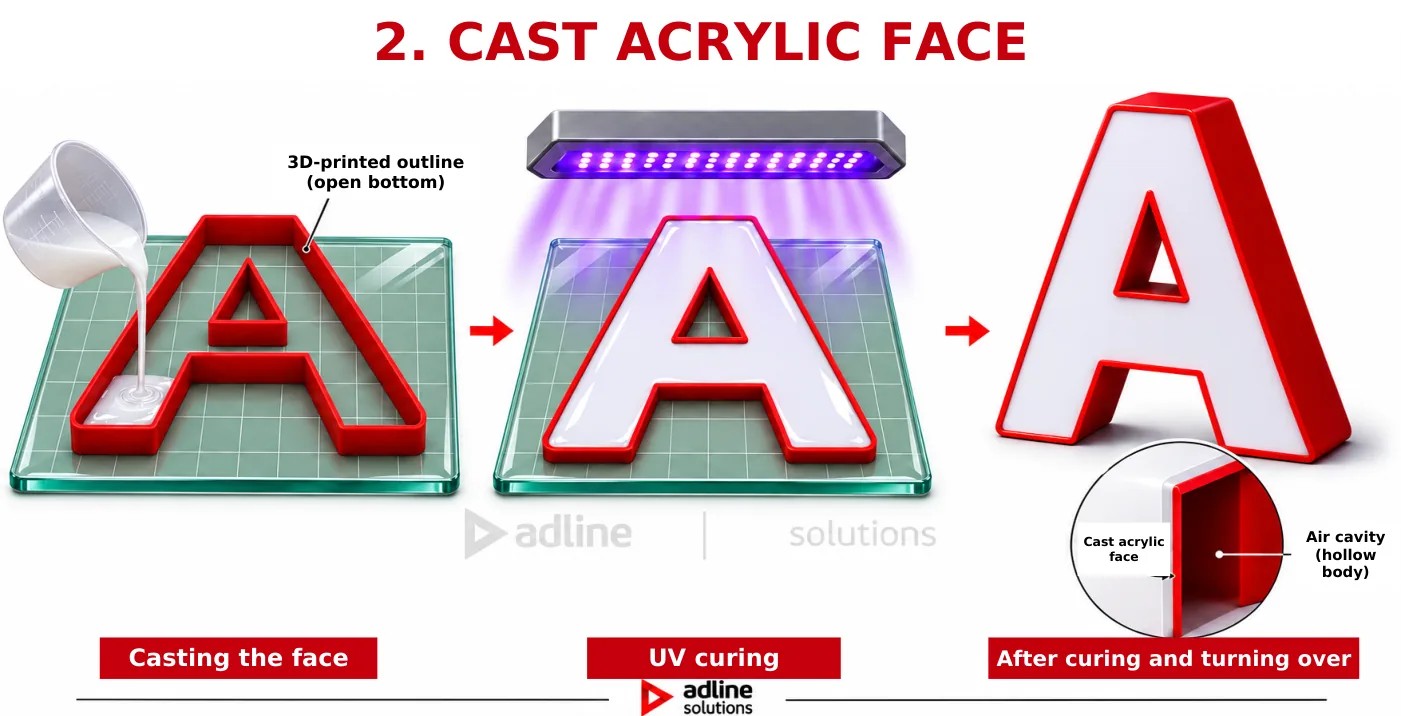
The AD-F4 prints the outline of the letter, with no bottom, on its glass plate. Acrylic resin is poured into the outline, and the plate goes into the MINGDA MD-C02 with the letters on it, so nothing has to be aligned. The UV lamps under the glass cure the resin from below in about an hour. The letter is then lifted off and turned over: the smooth face that formed against the glass becomes the front. Face and return come out as one piece, with no glued joint and no layers visible in the light.
You need: the AD-F4, the MD-C02 curing unit and the acrylic resin, which we supply.
Method 3
3D-printed face
Ready in one job
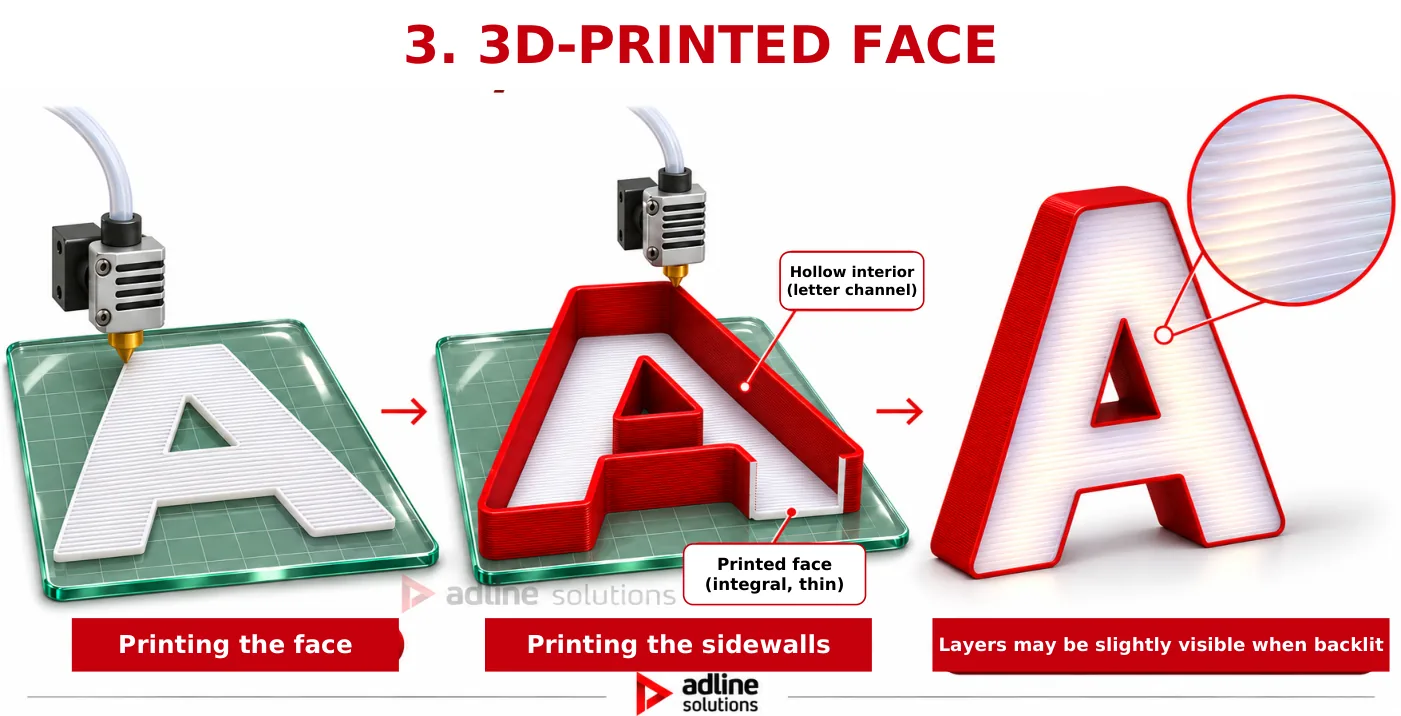
The AD-F4 prints the face first, flat on the glass plate, then builds the return on top of it in the same job. The letter comes off ready, with no cutting, gluing or pouring, and its front is the smooth side printed against the glass. With a white face 3 to 5 mm thick, the light of the LEDs spreads evenly, as the video shows; from very close, the layers can be slightly visible. It is also the method for unlit letters, where the printed face saves a step.
You need: the AD-F4 only.
A detail that makes the difference
An edge in the face colour
On letters with an acrylic sheet face or a cast resin face, we recommend printing the last layers of the return, the ones next to the face, in the colour of the face. The AD-F4 changes the filament by itself at the height set in the software, so the operator has no extra step.
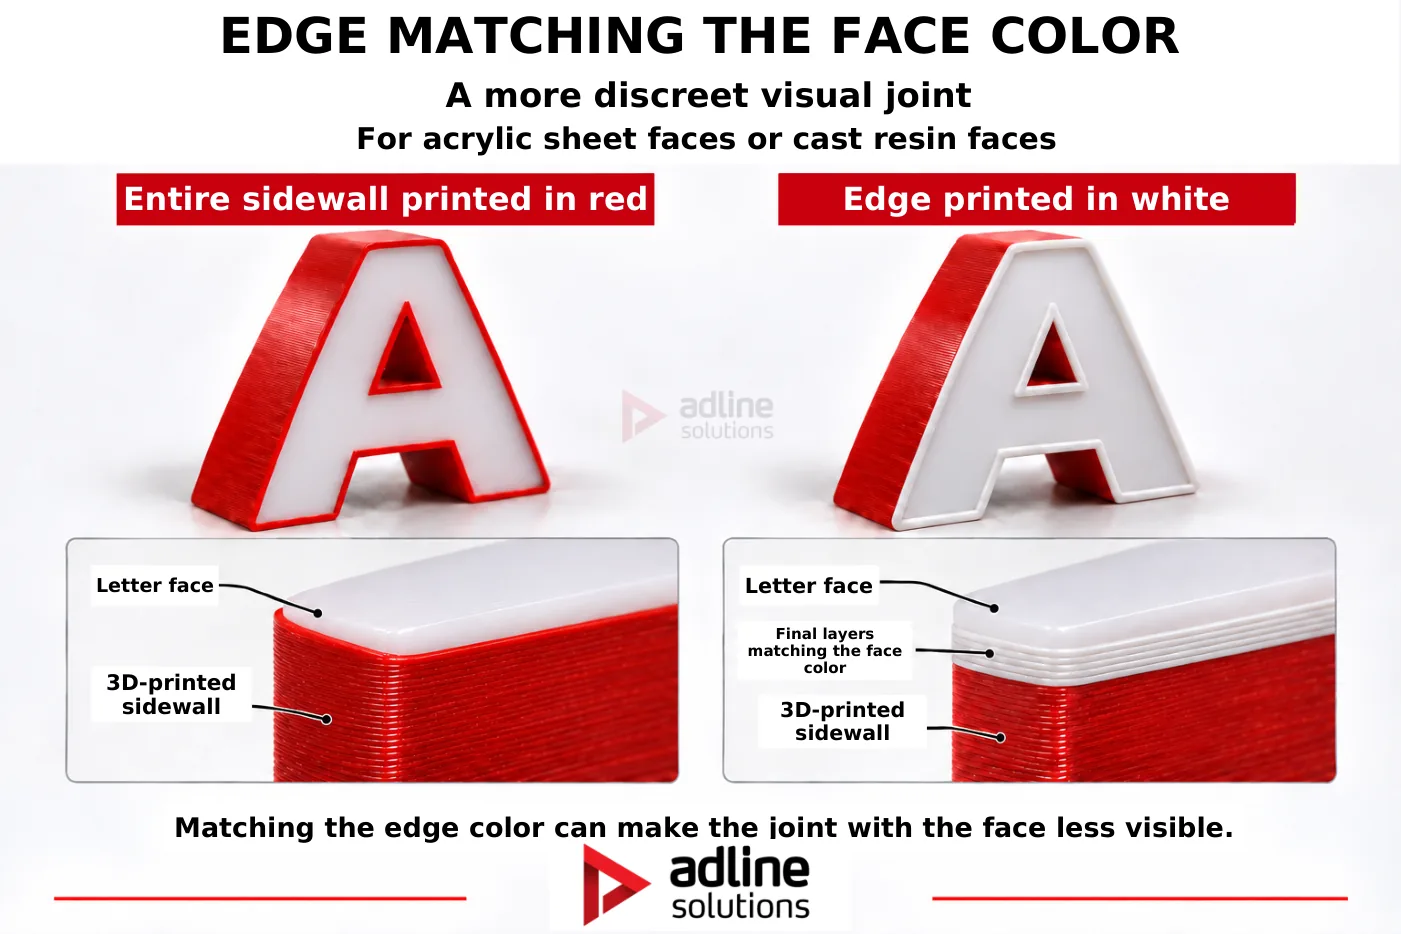
- The joint shows less. A white edge next to a white face makes the transition between return and face discreet. The white line becomes a design element, like a fine frame around the face.
- The light stays clean. Next to the wall, the light of the LEDs is reflected from the return onto the face. A coloured wall tints the edge of the face; a wall in the face colour keeps it even.
- With a cast face, the colour of the return does not pass into the resin. The liquid resin rests against the wall until it cures and can take on its colour: a band in the colour of the return appears around the edge of the face, visible even when the letter is unlit.
With a cast face, the layers in the face colour must cover the full height of the resin. Here they are the first layers printed, the ones on the glass, which come to the front once the letter is turned over.
Side by side
The three methods compared
The printer always makes the return; the face decides the rest.
1Laser-cut acrylic face
- When to choose it
- The most common choice
- What the AD-F4 prints
- The return, and the back if needed, in opaque AdPETG
- Face material
- Opal acrylic, laser-cut from the same file
- Extra equipment
- A laser for the face, plus adhesive
- After printing
- Cut the face and glue it on
- Lit with LEDs
- Yes, with even light
2Cast acrylic face
- When to choose it
- For a one-piece face with no glued joint
- What the AD-F4 prints
- The outline with no bottom, which holds the resin
- Face material
- Acrylic resin, cured under UV light
- Extra equipment
- The MD-C02 curing unit and the resin
- After printing
- Pour, cure (about 1 hour), turn over
- Lit with LEDs
- Yes, with no joint between face and return
33D-printed face
- When to choose it
- When you want the letter in one job
- What the AD-F4 prints
- Face and return in the same job
- Face material
- AdPETG; 3–5 mm for lit letters
- Extra equipment
- None
- After printing
- Nothing: the letter is ready
- Lit with LEDs
- Yes, with a 3–5 mm face; layers can be slightly visible up close
Before you order
Questions we get about the letter face
1Does the AD-F4 print only the return, or the face too?
Both. It always prints the return, the side wall of the letter, and it can also print the face and the back. Whether the face is printed or made from acrylic is your choice: the three methods on this page are the ways it is done.
2Can a 3D-printed face be lit?
Yes. A white printed face 3 to 5 mm thick spreads the light of the LEDs evenly, as the video on this page shows. Because the face is built in layers, they can be slightly visible from very close. Where the face has to look perfectly uniform up close, choose a laser-cut or cast acrylic face.
3Do I need the MD-C02 for cast faces?
Yes. The resin is cured with UV light, and the MD-C02 cures it evenly over the whole 1200 × 800 mm plate of the AD-F4: the plate goes in with the letters on it, and the lamps under the glass cure the resin from below in about an hour.
4Which method is used most?
The laser-cut acrylic face. Most sign shops already have a laser and know acrylic, so the AD-F4 replaces only the return they used to make by hand. The cast and the printed face save the cutting and gluing.
5Can the AD-F4 print the back of the letter?
Yes. The back can be printed in opaque AdPETG, so the letter is closed with a printed back instead of one cut from a sheet.
6Do I need to model the letters in 3D?
No. You open the vector file (.dxf or .svg) in MINGDA SignMaker, which builds the 3D letter from the outline or the font. The same vector file is used to cut the acrylic face on the laser.
7Why can a coloured band appear around a cast face?
Because the liquid resin rests against the coloured return until it cures and can take on its colour next to the wall. Printing the layers next to the face in the face colour, over the full height of the resin, prevents it: see the section on the edge in the face colour.
How much filament does a letter use?
We filmed a real job on the AD-F4 and published the slicer data. See what a 50 cm letter needs and calculate your own text.